Wednesday, July 15, 2015

Melting brick horror...sigh

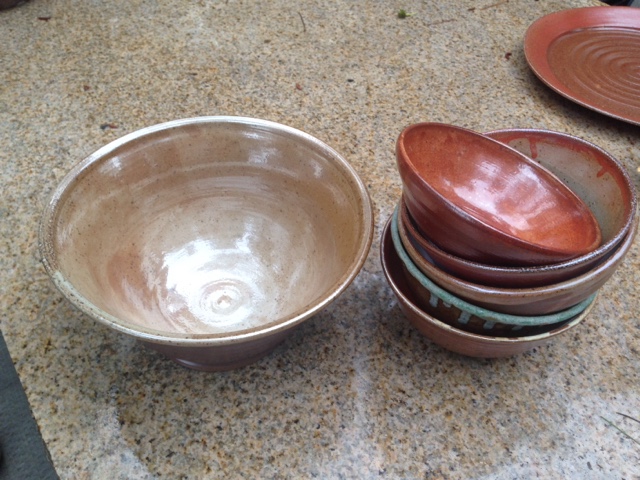
Now for the bad parts...the pictures speak for themselves...


Yup, it's as bad as it looks. Many of the bricks just melted/marsh mellowed!!! The worse part is that they fused together so repair will be a bear. Such is life. I consulted lots of people about this is what I've learned. The wonderful helpful people gave me tons of useful info on the Facebook soda and salt firing page so I'd suggest you read up on it there to get all the details. The gist of it is that these first 288 bricks were used ones I purchased knowing they had been used as the subfloor and outer layer of a salt fired kiln for 10 years or so. They were jet dp heavy duty high fire brick and would under normal circumstances hold up great to cone 10 firings but these, though they looked perfect, were spent. I have 3 other sources of used hard brick in the kiln and those all held up fine. This batch was just done. I couldn't have afforded to build this kiln had I not purchased used brick so I don't regret my choices, this was just bum unlucky. The gentleman who sold them to me felt awful and even offered to reimburse me but it is no more his fault than mine own. Perhaps I could have prevented this by testing the brick by firing them to cone 10 in another kiln first but not all of them failed so the testing would only had helped had I tested the right bricks. My conclusion is that I should have tested them but it may still not have prevented this. 

Well, I built this kiln and I am very proud of how it performed. If I built it, I can and will repair it! ;) 

Stay tuned for repair posts. One of the kind kiln builders (thank you Mathew) who shared his expertise when I started my build has directed me towards a great inexpensive source for new high fire heavy duty brick for my repairs. I am on my way this Friday to pick them up. In the meantime I have been throwing another whole load of pots and they are just waiting to be fired in my "new" repaired kiln.


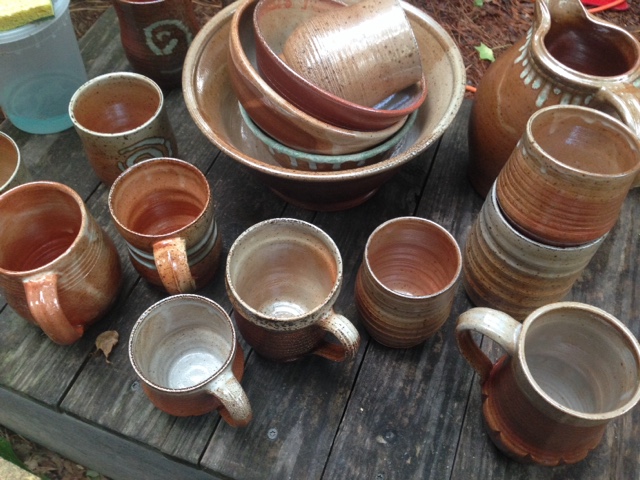
Result of First Soda Firing

So I stressed for days as the kiln slowly cooled. I tried peeking through the bung holes and couldn't see anything. I did pull out the last test ring 2 days post firing and spent hours trying to guess what everything was going to look like.


And finally I was able to open the kiln.


You get the idea. Please ignore the fact that most of these pieces were just practice pieces I threw at my week long throwing course up at the John c Campbell folk school a few weeks prior and many aren't really "my" style work. I really liked the results though there is plenty I'd do different. The deep reds, the lustrous quality to many pieces, all of it I loved!!! So, I count it as a success and I ignored the big (huge) problems for a day to just enjoy my pieces first. 
Yeah, sometimes I think it's ok to bury my head in the sand if only for a day, lol.


First Soda Kiln Firing...


Well, the first firing was definitely an experience. Sorry it has taken me so long to update the blog but I took tons of pictures and notes so I can share the full thing.
Finally got everything loaded in the kiln and closed it up tight at 7PM on May 22nd.


Turned on one burner to 1psi. Temp rose 92 degrees in 20 minutes so decreased to 1/2psi. Had to lower to the needle barely above zero psi to decrease temp rise. By 8pm temp rise slowed and we were at 244 degrees. Hubby and I sat watching the sunset and pretending we were sitting by a gourgeous fire (lol, which we were, sorta)!


At 11pm were at 401 degrees, had tested the safety valves and trusted them to work so we headed to bed, fingers crossed. I woke up at 4:30am and dud a quick kiln check. All good and temp 540. Back to sleep. By 6:10am I gave up on attempting to sleep and headed down to kiln sit. Temp was now 566.

Russ and I settled down with our coffee (in mugs made by my fellow potter Christy), still in our pjs to kiln sit. 6:40 psi increased to 1/2 and second burner fired up. 6:45 temp 608, 7:45 temp 720, 8:30 temp 766 burners increased to 1 psi, 8:45 temp 812, 9:00 temp 845, 9:30 temp 882 burners increased to 1.5 psi, 10 temp 942, 10:05 increased to 2 psi, 10:30 temp 1021.
11 am issued started... Psi dropping. Checked everything and noticed propane tank was freezing up.

Yikes! Did an emergency tank swap (we had several tanks fortunately). At 11:30 we did a quick tank swap that caused about a 40 degree drop in temp according to the pyrometer and restarted on a smaller tank at 4 psi. By 11:45 the small tank started freezing. Temp dropped to 1108 before we were able to hook up our larger house tank and temp was rising all running well by 12:05 temp 1169. At 1:18 psi was 4.5 and the 3rd tank was freezing up too! Uuuggghhh...we wrapped the tank in a warm towel, found an old heating belt I used to use on my car boys for beer brewing and pushed onwards. 2:00pm temp 1440 and psi 6, 3:00 temp 1665, 4:00 larger (3rd tank) was empty so swapped out. We filled a large storage tub with warm water and placed the tank in it to keep from freezing. I've heard since then from several people that this is a BAD idea but others say it is effective and not dangerous. I still have mixed feelings so planning on avoiding this choice in the future by looking into purchasing/renting a larger tank. Sad part is that a year ago I had them remove a much larger rental tank because we weren't using enough propane at the house to justify it and had purchased the smaller tank as a replacement...sigh...


Sent my boys out to get a refill on one tank as I was afraid we'd run out before the end of the firing. At 4:15 temp 1733, closed damper to 2. 4:30 temp 1761 psi 8. 5:42 psi 10 damper3, 6:50 temp 2041 psi 13 damper 5. 7:50 noticed blockage buildup near rear burner causing burner to back up. Knocked off blockage (appears to be melting brick) using an angle iron, damper at 7. 8:00pm temp 2182, Sprayed soda 3 seconds per opening (6 openings). Allowed temp to return and did again a total of 4 times. 8:22 decreased to 9psi. 8:25 removed first test ring. 8:28 temp 2194 added round of soda, 8:37 removed 2nd ring, 8:45 added soda temp 2215, 8:55 temp 2228 added soda and removed 3rd ring, 9:00pm temp 2230 added soda one last time psi 7.


9:40 pm pyrometer reads 2225 and cones down. 10:00 burners shut off all bungs opened and damper opened. 10:45 temp 1781, kiln clammed up damper closed and bung holes closed.
may 24th 6:00am 1152
31 hours post firing temp 582
May 27th, temp 320, second wicket layer removed and kiln unloaded 10:00am.


Thursday, May 28, 2015

Loading the new kiln while hubby puts up roof framework

I started mixing glazes, washes, and preparing the work for loading. It took much longer than I expected to get everything done. Used a Malcolm shino glaze without redart, a wash, a liner glaze and an accent glaze. I tried to keep a lot of the pots bare as I really want to see the soda flashing etc. the wadding was 50/50 alumina hydrate and EPK.


Most of the pieces were practice pieces I made at a workshop since I figured my first firing will be rough.
They were loaded into the kiln. It was a loosely packed partial load. I remembered to place wadding on all the pots and kiln posts.


I opted not to kiln wash my shelves. Not sure that is a good choice but I'll try it this way. Added in my test rings and a couple of cone packs.
Saturday evening we fired up the kiln, crossed our fingers, and had a beer. It ran all night on less than one psi and slowly climbed as we hoped!


As I was loading the kiln, Russ and my boys built the framework for a metal roof to protect the kiln. Firing has started and the nail biting begins...


Ironwork and remainder of chimney

The remainder of the ironwork is complete. Here's the chimney damper support:


We welded in the remaining ironwork (meaning my hubby, not "we") and took down the temporary bracing.


The chimney was extended up to about 7 1/2 feet and framed in with more ironwork.


I also layed out the wicket (kiln door). It is a double layer thick of IFB 23. These were my nice square 50 IFB that Tom kindly traded with me for some key shaped ones.


Of course we had to test the burners. As expected, they shot straight across to the wall then up the wall. To make the transition smoother I added some angled bricks in both corners to aim the flames up.


Safety shut off featured were tried and worked great! Flames ran well and gas lines were checked for leaks with some soapy water.


Here are the flame "ramps" to encourage them upwards. Simple but effective.


The silicon carbide bottom shelves were placed in and I am ready to load the Kiln!!!


Monday, May 18, 2015

Burners and gas lines going in!

So my hubby is installing burners and gas lines. He got a bunch done while I was away at the John C Campbell folk school in NC taking a class from Stephen Jepson. I came home to this:


I can't describe any of this other than to say my hubby built the burners out of stainless pipe, fittings, welding stuff... I'll get him to post a blog with descriptions of all. We did not scrimp on the safety portion so each burner has a baso valve and pilot light. For now I can only provide the pictures. The picture above is the one in front and here is a picture of the rear one by the chimney.


Here's my hubby installing it:


The burners are adjustable forward and back to adjust the distance of the burner to the kiln. Three trips to Home Depot later and it was too dark to finish and trial. :( We also need to pick up a little more angle iron to finish up the chimney support. 

Friday, May 8, 2015

IFB arch is up! and some more iron support

I opted to add a layer of 1" ceramic fiber over the hard brick arch to help seal up any leaks (and because I already have some to spare). Thank you soda fire Facebook buddies for all the advice.


Next went the IFB arch. I had to cut them down as the key shape made too straight of an arch. ;( With some finagling, I was able to cut some and use about half "as is". :) I did no fancy calculation and just eyeballed them. It is a short arch so I was able to hold them up and formed the sprung arch over the ceramic fiber without compressing it. It actually sits about 1/8" above the fiber blanket.


It took a few days of cutting and fitting but the arch is up! We ran a double layer of angle iron across the top of the door and welded into the side supports.


I used IFB to fill it in. Better explained by the pictures. This way the arch has plenty of support and it will be an easy stacking for the door. Because of the angle iron I ended up with a small gap at the front of the arch. I added a little ceramic fiber blanket covered by tin foil to fill in the sliver.


Finally a stack of hard brick to support and close it all up. Everything seems tight and well supported but I won't know how I did until the kiln is running. :)

Hubby also built a support for the burners with holes to adjust the placement.


Look at the pics and you can see where all the ironwork was welded. Some supports were just to be extra cautious and reinforce and others were to correct my sub-standard brickwork. :)The top angle work is temporary and will be trimmed off. The chimney needs another 4 feet added and the ironwork on the chimney needs to be welded on.
But...the brickwork (except the chimney) is finished!!! I kept all my fingers too!!! (That tile saw is quite the hazard!) Lol! Sooo excited!